
Paypal のデフォルト言語が日本語になってしまう現象
対応
- 管理画面右上「Preferences」の「General settings」を選択
- 「Address」の「Country」を「United States」に変更
以上で、デフォルト言語が英語になる。「Address」の部分をShopifyのタグでページ上に表示している場合は注意。
該当の部分は直で打ち込んで表示させる。
Paypal のデフォルト言語が日本語になってしまう現象
対応
以上で、デフォルト言語が英語になる。「Address」の部分をShopifyのタグでページ上に表示している場合は注意。
該当の部分は直で打ち込んで表示させる。
チートシート 独自タグを使うときはここを見る
http://cheat.markdunkley.com/
基本的な使い方はここで検索
http://wiki.shopify.com/Main_Page
フォーラム 分からない場合はフォーラムで検索
http://ecommerce.shopify.com/
独自ドメインの登録方法
・独自ドメインはすでに取得済み
・いつも使いなれている日本のドメイン管理会社(今回はお名前.com)を使用
・メールアドレスは別サーバー(今回はさくらインターネット)で使う
以上
メールアドレスの作成や設定は以下を参考
メールアドレスの作成・変更
http://support.sakura.ad.jp/manual/rs/mail/setmail.html
メールソフトの設定
http://support.sakura.ad.jp/manual/rs/mail/soft.html
※今回はすでにさくらインターネットでメールアドレスを使用していたが、MXレコードを設定後、送受信が出来なくなった。
原因は、メールサーバーに独自ドメインを使用していた為?
○○○.com を ○○○.sakura.ne.jp 変更したところ、正常になった。
購入テストを行う方法
メールも送られてくるので確認する。
複数通貨の設定したときにユーザーの注文確認画面で値段の表示がおかしくなる現象について。
原因
class ‘money’ に対して処理されるので、2重に変換される?
対応
Template Editor で 「customers/order.liquid」のclass で ‘money’ を設定されている部分をすべて削除する。
送料の設定は国ごとに指定する必要がある。地域別(ヨーロッパ、北米など)では設定できない。
国数が多くなると、設定がかなり面倒になる可能性がある。
キーボードマクロソフトを使い、地域ごとに設定し出来るようにすると、手間は半減。
キーボードマクロ&マウスマクロ KMmacro http://www.vector.co.jp/soft/win95/util/se211440.html
送料無料の設定
参考
http://wiki.shopify.com/How_to_add_a_contact_form_to_your_shop
{{ page.content }}
  {% form 'contact' %}

    {% if form.posted_successfully? %}
      <p>Thanks for contacting us! We'll get back to you as soon as possible.</p>
    {% endif %}

    {% if form.errors %}
    <p>
      <ul style="color:#E0360F">
      {% for field in form.errors %}
        {% if field == 'body' %}
        <li>Your message cannot be blank.</li>
        {% endif %}
        {% if field == 'email' %}
        <li>Please enter a valid email address.</li>
        {% endif %}
      {% endfor %}
      </ul>
    </p>
    {% endif %}

    <ul id="contact-form">
      <li>
        <label for="name">Name</label>
        <input type="text" id="name" name="contact[name]" />
      </li>
      <li>
        <label for="email">Email</label>
        <input type="email" id="email" name="contact[email]" />
      </li>
      <li>
        <label for="message">Message</label>
        <textarea id="message" name="contact[body]"></textarea>
      </li>
      <li>
        <input type="submit" value="Send" />
      </li>
    </ul>
  {% endform %}
以上
これで、http://ホームページURL/pages/contact-us にアクセスすると、コンタクトフォームが表示されます。
参考
http://wiki.shopify.com/Related_Products#Using_Product_Tags
商品の「Tags」を利用して関連商品を表示する
{% include 'related-products' %}
以上
参考URL
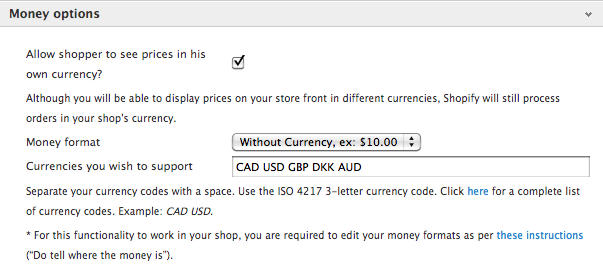
http://wiki.shopify.com/How_to_Show_Multiple_Currencies
※通貨は表示の変更のみ。支払いは設定の通貨で行われる。
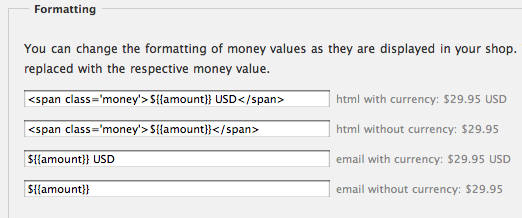
<span class='money'></span>
で囲む
{% include 'currencies' %}
{% include 'currencies-switcher' %}
以上
2013/05/09 追記
別サイトで必要があったので試したが
「16」のソースでは動かなかった。
以前に使用していたものを使用して解決
{% if settings.show_multiple_currencies %}

{{ "/services/javascripts/currencies.js" | script_tag }}
{{ "jquery.currencies.min.js" | asset_url | script_tag }}

<script>

{% if settings.currency_format %}
Currency.format = '{{ settings.currency_format }}';
{% endif %}

var shopCurrency = '{{ shop.currency }}';
var cookieCurrency = Currency.cookie.read();

/* Fix for customer account pages */
jQuery('span.money span.money').each(function() {
  jQuery(this).parents('span.money').removeClass('money');
});

jQuery('span.money').each(function() {
  jQuery(this).attr('data-currency-{{ shop.currency }}', jQuery(this).html());
});

// If there's no cookie.
if (cookieCurrency == null) {
  Currency.currentCurrency = shopCurrency;
}
// If the cookie value does not correspond to any value in the currency dropdown.
else if (jQuery('[name=currencies]').size() && jQuery('[name=currencies] option[value=' + cookieCurrency + ']').size() === 0) {
  Currency.currentCurrency = shopCurrency;
  Currency.cookie.write(shopCurrency);
}
else if (cookieCurrency === shopCurrency) {
  Currency.currentCurrency = shopCurrency;
}
else {
  Currency.convertAll(shopCurrency, cookieCurrency);
}

jQuery('[name=currencies]').val(Currency.currentCurrency).change(function() {
  var newCurrency = jQuery(this).val();
  Currency.convertAll(Currency.currentCurrency, newCurrency);
  jQuery('.selected-currency').text(Currency.currentCurrency);
});

var original_selectCallback = window.selectCallback;
var selectCallback = function(variant, selector) {
  original_selectCallback(variant, selector);
  Currency.convertAll(shopCurrency, jQuery('[name=currencies]').val());
  jQuery('.selected-currency').text(Currency.currentCurrency);
};

jQuery('.selected-currency').text(Currency.currentCurrency);

</script>

{% endif %}